How to Add Multiple Custom Spawn Points in Project Zomboid
Do you want to know how to add multiple custom spawn points in Project Zomboid? Adding custom spawn points can enhance your gameplay experience by allowing you to start the game in different locations. Whether you want to create a more challenging survival experience or you simply want to mix things up, custom spawn points can add variety to your gameplay. In this article, we will guide you through the process of adding multiple custom spawn points in Project Zomboid, giving you the freedom to tailor your starting location to suit your preferences.
Guided Walkthrough
Create the Spawn Points File
- Navigate to the AleForge panel and select your server
- Open Files
- Navigate to
media/maps/ - Create a new file by clicking the button in the top right of the file manager
- Input the code below in the custom spawnpoints code
- Go to the Project Zomboid Map Project and find a location you want your players to spawn at
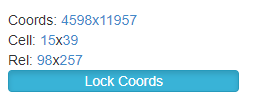
- Click on the
Map Coordinates. Replace the x’s in the code with the Cell and Rel values found at your coordinates. TheworldXandWorldYare the Cell values and thepsoXandposYare the Rel values. You can check out the filled out example here. - You can add more spawn points for one option, like in this example.
- Click
Create Fileand name the filecustom_spawnpoints.lua
Custom Spawnpoints Code
function SpawnPoints()
    return {
        unemployed = {
            { worldX = x, worldY = x, posX = x, posY = x, posZ = 0 },
        }
    }
end
Filled in Custom Spawnpoints Code
function SpawnPoints()
    return {
        unemployed = {
            { worldX = 15, worldY = 39, posX = 98, posY = 257, posZ = 0 },
        }
    }
end
Multiple Spawn Points
function SpawnPoints()
    return {
        unemployed = {
            { worldX = 15, worldY = 39, posX = 98, posY = 257, posZ = 0 },
            { worldX = 15, worldY = 39, posX = 42, posY = 54, posZ = 0 },
            { worldX = 15, worldY = 39, posX = 137, posY = 179, posZ = 0 }
        }
    }
end
Creating Multiple Spawn Point Options
To create multiple spawn point options, please follow steps 1 through 9 above
but choose a different name, such as myspawn_spawnpoints.lua .
Restricting Spawn Points to an Occupation
If you wish to add occupation-specific spawn points, you can create spawnpoints.lua similar to the below:
function SpawnPoints()
return {
  constructionworker = {
    { worldX = 129, worldY = 37, posX = 42, posY = 32, posZ = 0 },
    { worldX = 129, worldY = 37, posX = 172, posY = 101, posZ = 0 },
    { worldX = 129, worldY = 37, posX = 38, posY = 131, posZ = 0 }
  },
  fireofficer = {
    { worldX = 10, worldY = 222, posX = 191, posY = 4, posZ = 0 },
    { worldX = 10, worldY = 222, posX = 207, posY = 174, posZ = 0 },
    { worldX = 10, worldY = 222, posX = 34, posY = 62, posZ = 0 },
    { worldX = 10, worldY = 222, posX = 142, posY = 135, posZ = 0 }
  },
  parkranger = {
    { worldX = 8, worldY = 171, posX = 15, posY = 109, posZ = 0 },
    { worldX = 8, worldY = 171, posX = 219, posY = 88, posZ = 0 },
    { worldX = 8, worldY = 171, posX = 117, posY = 125, posZ = 0 },
    { worldX = 8, worldY = 171, posX = 142, posY = 63, posZ = 0 }
  },
  policeofficer = {
    { worldX = 17, worldY = 114, posX = 39, posY = 208, posZ = 0 },
    { worldX = 17, worldY = 114, posX = 137, posY = 10, posZ = 0 },
    { worldX = 17, worldY = 114, posX = 86, posY = 227, posZ = 0 }
  },
  securityguard = {
    { worldX = 121, worldY = 169, posX = 177, posY = 79, posZ = 0 },
    { worldX = 121, worldY = 169, posX = 158, posY = 219, posZ = 0 },
    { worldX = 35, worldY = 94, posX = 67, posY = 47, posZ = 0 }
  },
  unemployed = {
    { worldX = 172, worldY = 49, posX = 155, posY = 18, posZ = 0 },
    { worldX = 172, worldY = 49, posX = 81, posY = 188, posZ = 0 },
    { worldX = 172, worldY = 49, posX = 89, posY = 218, posZ = 0 }
  }
}
end
Adding SpawnRegions
- After you have created your spawn point files open
Filesagain - Navigate to
.cache/Server - Click
dedicated_spawnregions.luato open it for editing - Add any spawn files you created. You can name the spawns anything you like. Each spawnpoint requires its own file. It should look similar to the below example
dedicated_spawnregions.lua file name may be different depending on the name of your save file
function SpawnRegions()
    return {
        { name = "Muldraugh, KY", file = "media/maps/Muldraugh, KY/spawnpoints.lua" },
        { name = "Riverside, KY", file = "media/maps/Riverside, KY/spawnpoints.lua" },
        { name = "Rosewood, KY", file = "media/maps/Rosewood, KY/spawnpoints.lua" },
        { name = "West Point, KY", file = "media/maps/West Point, KY/spawnpoints.lua" },
        { name = "My AleForge Spawn", file = "media/maps/custom_spawnpoints.lua" },
    }
end
Enabling the New Spawns
Creating custom spawn points in Project Zomboid can enhance the player experience and add depth to the game. However, it’s important to remember that the server needs to be restarted to enable these changes. By following the steps outlined above and considering the various customization options available, server administrators can provide a unique and tailored gameplay experience for their community.