How Do I Convert Singleplayer Save Data to Multiplayer Save Data
When you transfer a single player world to your server or vice-versa, your inventory and player statistics will not transfer unless certain changes are made to your world. Additionally, if you try to join your world or server, you may not be able to if you haven’t converted your world or deleted the players.db file. This is because the way multiplayer and singleplayer load player data is stored differently.
Converting singleplayer data to multiplayer data is an indepth and complex process. We’ve broken down the steps required as much as we can to make this easier to read.
- Confirming players.db is a Singleplayer file
- Creating a Multiplayer players.db file
- Converting Singleplayer players.db to Multiplayer players.db
- SQL Commands
Confirming players.db is a Singleplayer file
- Open the AleForge Panel
- Stop your server
- Upload your single player world to your server
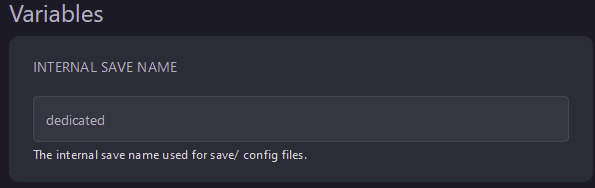
- Open the Settings page for your server and note down the
Internal Save Namevalue
- Create a folder for a workspace on your computer. This is not required but it will make it easier to work on converting your player data
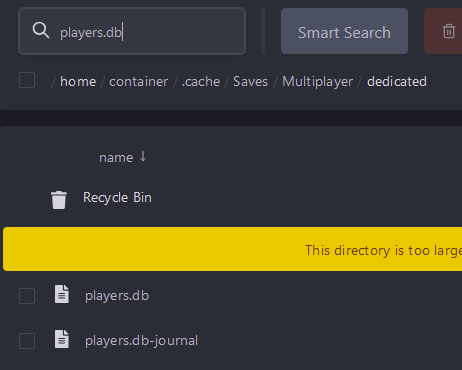
- Connect to your server using SFTP
- Navigate to
.cache/Saves/Multiplayer/Internal Save Name - Download the
players.dbfile and place it in your workspace folder
- Rename the
players.dbfile you moved tooldplayers.db

- Download SQLite Database Browser from https://sqlitebrowser.org/dl/
- Open SQLite Database Browser
- Drag and drop
oldplayers.dbonto SQLite Database Browser - Click Browse Data and then select local players
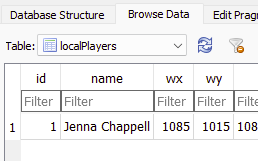
If you see player data you can confirm the file is in the single player format
Creating a Multiplayer players.db file
- Delete the players.db file from your server using the SFTP client
- Start the server to generate a multiplayer-compatible
players.dbfile - Join the server and create a new character. It doesn’t matter what statistic you choose for the player as this will be reset after migrating the data.
- Leave the server and then stop it from the console
- Navigate to
.cache/Saves/Multiplayer/Internal Save Namein your SFTP client - Download
players.dbto your workspace - Rename
players.dbtonewplayers.db

Converting a Singleplayer players.db file to Multiplayer players.db
- Open SQLite Database Browser again and drag and drop
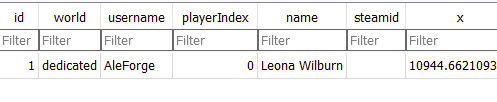
newplayers.dbonto the browser - Click
Browse Datathen select thenetworkPlayerstable. If there are any players in the table you can confirm this is in the multiplayer format
- Open the
oldplayers.dbfile with SQLite Database Browser - Click
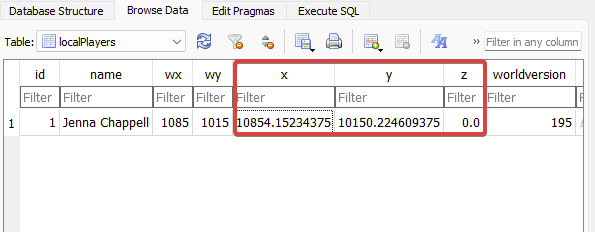
Browse Dataand open thelocalPlayerstable - Copy the X,Y,Z values into your preferred note taking software
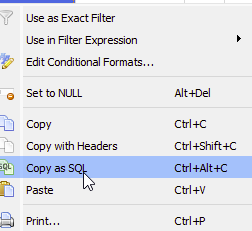
- Right-click on the field in the data column for your player and press
**Copy as SQL**. Paste this into your note.
- Open the
newplayers.dbfile in SQLite Database Browser - Click
Execute SQL, then run the SQL commands mentioned here. Replace the values in the SQL command with the values you took note of. You will want to modify thenetworkPlayerstable . - Click the
Execute all/selected SQL button. This looks like a play button located near the top left of SQLite Database Browser

- Click
Browse Dataand confirm the changes were applied - Click
File -> Write Changesand thenSave All - Exit SQLite Database Browser
- Open your workspace folder and rename
newplayers.dbtoplayers.db - Upload the new players.db to your server using SFTP to
.cache/Saves/Multiplayer/Internal Save Nam - Start the server and connect to join with your Single player character data
SQL Commands
Update player data
UPDATE “main”.”REPLACE_WITH_TABLE” — Select which table you’d like to modify.
SET data = NULL — Replace “NULL” with value inside the copied SQL command VALUES(); method
WHERE id = 1; — The ID is the row you’re replacing the value of for the character you created earlier.
Update player X coord
UPDATE “main”.”REPLACE_WITH_TABLE” — Select which table you’d like to modify.
SET x = 0 — Replace with the X coordinate of the player.
WHERE id = 1; — The ID is the row you’re replacing the value of for the character you created.
Update player Y coord
UPDATE “main”.”REPLACE_WITH_TABLE” — Select which table you’d like to modify.
SET y = 0 — Replace with the Y coordinate of the player.
WHERE id = 1; — The ID is the row you’re replacing the value of for the character you created.
Update player Z coord
UPDATE “main”.”REPLACE_WITH_TABLE” — Select which table you’d like to modify.
SET z = 0 — Replace with the Z coordinate of the player.
WHERE id = 1; — The ID is the row you’re replacing the value of for the character you created.